
Windows Disk Management
As
mentioned above, Windows Vista and Windows 7 are equipped with a Disk
Management tool. With this tool you can partition your hard drive, shrink or
expand volumes, and create new ones. I will walk you through the process as
seen on Windows 7.
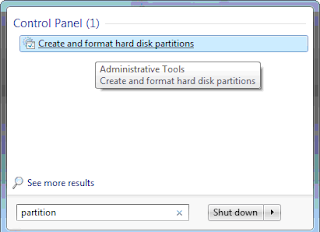
To launch the Disk Management tool go to > Start
and type > partition in the search box. From the results click > Create
and format hard disk partitions.
You
will now see a list of volumes and their properties. They can refer to several
hard drives or partitions on a single hard drive. Below is a screenshot
of what my single hard drive setup looks like.

Example 1:
Let’s say you have a single hard drive and a single volume called C on which your operating system and all your programs are installed and on which you keep all your personal files. You have several GB of free space and want to create a new volume or partition called D to store all your personal data. You do not have any unallocated space.Before you can create a new volume, you must free up space from which you can create it, meaning you have to create unallocated space. To do this, right-click on > C and select > Shrink Volume… Windows will take a moment to query the volume for available shrink space.

You will now see the space by which you shrinked C as unallocated space right next to your C volume. To create a new volume, right click > Unallocated and select > New Simple Volume…


Example 2:
Let’s say you already have two volumes called C and D. You want to shrink C and then add the unallocated space to D. You would go about it just as in the previous example, only that after creating the unallocated space, you would not create a new volume, you would attempt to extend volume D.When you have unallocated space, you can in theory extend any partition by that space. Simply right-click the respective partition and select > Extend Volume… Now you might realize in frustration that this option is greyed out and hence not available.

Another limitation in Windows 7 is that you can only shrink or extend NTFS or unformatted partitions.
-
Niktricks.blogspot.com


0 comments:
Post a Comment