
Master the Taskbar and Start menu
The Start Menu
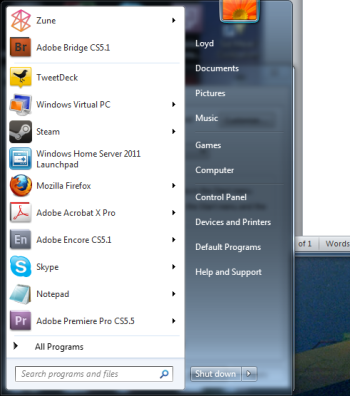 The Start menu, at its most basic.The Start menu is so named because that’s where you go to start applications, restart or shut down Windows, and perform other basic application management chores. When you start up a new system, or perform a clean install of Windows, this is the Start menu you see.
Lots of people happily use the Start menu in this state, which is very XP-like. Unlike XP, though, the applications are sorted alphabetically. This tends to give recent XP converts heartburn, but you can change this behavior when you customize the Start menu. My personal preference is alphabetical sort, which you could do in XP by context clicking on the All Programs section and sorting.
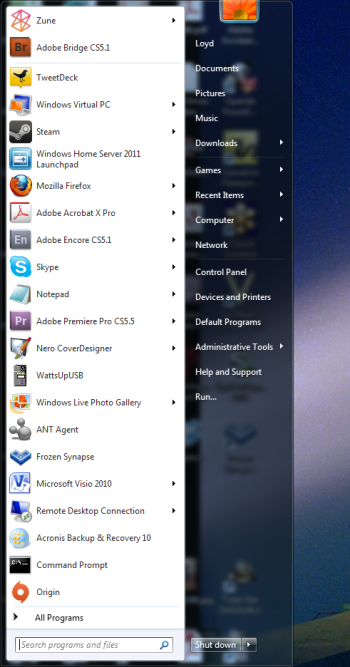 I’ve customized my Start menu to work more effectively for me.At right is my Start menu, as I use it.
The first thing you’ll notice is the size--more programs are visible on the basic Start menu, without having to go to the dreaded "All Programs" section. Also notice that Downloads, Games, and Computer are pop-out menus. I use those particular folders frequently, so I find that using them as pop-outs on the Start menu is preferable to launching the actual Window, then clicking something else.
Now let's customize the Start menu. If you context-click (right-click) on the Start menu button, one of the two options is Properties. Click on that option, and the following window appears. (The other option merely opens Windows Explorer.)
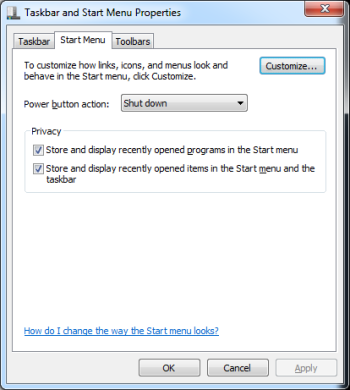 Customization begins here for both Start menu and the Taskbar.You'll see a pair of settings here that you should enable: (1) Store and display recently opened programs in the Start menu, and (2)Store and display recently opened items in the Start menu and taskbar. These are put under "Privacy" because you may not want them enabled for a shared system, but for most users, turning these options on (if they're not already on by default) is a no-brainer.
Now click the Customize button.
You’ll see a fixed-size window (you can’t make it bigger), with a lot of different options. Here’s a summary of the changes I made to my own Start menu. I’m only going to list those changes, not what I kept at default settings.
- Number of recent programs / recent items to display (under "Start menu size"). The default is 10; I set it to 20, since I have a large display. If you’re running on a relatively low-resolution monitor (like a laptop), you may want to keep the number at 10.
- Computer. I enabled "Display as a menu." The various drives and top folders appear on a fly-out menu. Saves a click.
- Downloads. The default is "Don’t display," but I like it as a link, which lets me get to the Downloads folder with one click.
- Games. I display this in the Start menu as a fly-out menu. That’s a much quicker way to launch games that are in the Windows games folder.
- Network. I don’t often access this folder, but when I do, I want to get to it quickly, so enabling it as a link is fine.
- Recent Items. I turned this on, but it's one of those items you may want leave disabled on a shared system. On the other hand, it’s very handy to have quick access to recent files, without needing to find the Jump List for the individual application that may be associated with the files.
- Run command. This avoids having to type "Run" in the search box.
- System administrative tools. By default, this display option is turned off. I like having access to system management tools. It has some useful stuff that’s hard to find, so enabling this tools display is often helpful when you need to troubleshoot a problem.
Note that I leave "Sort All Programs menu by name" enabled (that’s the default.) If you uncheck it, the Start menu will sort programs by most recently installed. (If you change it after you’ve installed a bunch of apps, it will remain sorted alphabetically for a time, until you install more apps.) What you won’t get is the old Windows XP behavior, where you could manually reorder the icons in the Start menu. Some users may not like this.
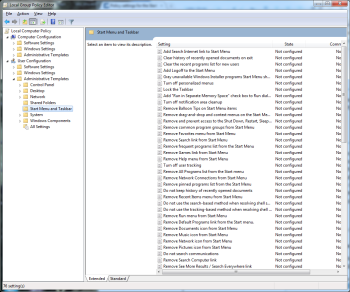 The policy editor lets you change many Windows settings, including the Start menu and Taskbar.If you’re so inclined, you can change many more settings by running the Windows 7 Group Policy Editor, but be cautious when using the policy editor.
Start Menu Shortcuts and Tips
Now that you’ve customized the Start menu to your preferences, it’s time to look at some additional shortcuts and tips on using the Start menu.
If you have a lot of programs installed, consider using the keyboard instead of hunting for them in the All Programs window. All you have to do is hold down the Windows logo key and the R key at the same time. This brings up the run box. If you type the name of the program, it will run. However, this assumes you know the exact name of the application. For example, if you want to run Word, you have to type "winword.exe". What, you didn’t know the actual Word program name is winword.exe?
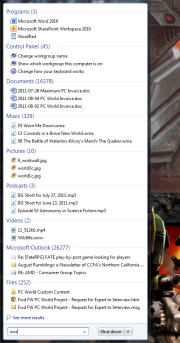 This is what I see when I type the letters “wor” in the Start menu search bar.If you know part of the name, but not the whole name, use the Start menu search function. Press the Windows logo key and just start typing "wor". If you wait just a moment for the search function to do its job, you’ll see quite a list.
Here, your version of Word appears as the top choice. But a variety of other apps, shortcuts, and document names have popped up as well, so you can click on whichever of those you want. On the other hand, when I hit the Enter key after typing "wor" (minus the quote marks, of course), then the top item in the list is opened--in this case, Microsoft Word. Simple and efficient.
Note that you will have to type more characters than you think you need on occasion. If you type "ex," then hit enter you’ll likely run Internet Explorer. If your intent was to run Excel, you’ll need to type "exc" at a minimum.
Now it’s time to move on to the Windows taskbar.
Customizing the Windows Taskbar
The Windows Taskbar has evolved from being a simple indicator of open applications to a much more active user interface entity in its own right. The key features of the taskbar, as you probably have discovered, are Jump Lists and Aero Peek. However, before examining taskbar features, it’s worth spending some time customizing the taskbar. Like the Start menu, the taskbar can be configured to behave more to your liking.
First, let’s take a look at my taskbar (click on the mini-image for a full-size view). This is actually relatively uncluttered for me--I often have many more windows and apps open.

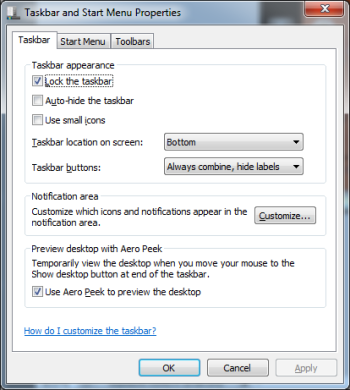 Taskbar Property Sheet is where you begin your journey in customizing the taskbar.Right-click on any empty space in the taskbar and click Properties. The taskbar and Start menu properties sheet will pop up, with the taskbar tab active.
This is the default setting--taskbar locked, at the bottom of the window and Aero Peek enabled. I strongly suggest you leave Aero Peek turned on--it’s one of the most useful features of the Windows 7 taskbar. When it comes to the way you view icons, applications and files in the taskbar, though, it's mostly up to your personal preference.
The default is to have just unlabeled icons. If you run more than one instance, or have multiple documents open in a particular app, you’ll see a layered icon. You will never see more than three layers, though. So you won’t know if you’ve got more than three docs open or three instances of a particular app running. You also won’t know the names of the documents without hovering over the icons.
If this bugs you, you can change the taskbar buttons to Combine when taskbar is full in the Taskbar button pulldown. Windows will combine certain sets of objects when the taskbar fills up. Note that what's visible in the taskbar may vary, depending on what types of documents or folders you open, and the number of each type.
If you choose never combine, what’s visible in the taskbar becomes smaller and smaller, until they’re very small icons.
Other options on the primary properties page include "Lock the taskbar" (default is the bottom of the screen), "Auto-hide the taskbar" (useful on laptops or other screens relatively light on pixel real estate) and "Use small icons" (also useful on smaller screens.)
If you click on Customize, you’ll get a screen that allows you to alter the behavior of taskbar and notification icons. The notification area (the tiny up arrow on the right side of the taskbar) is where all the old tray apps that load on startup live now. You can, if you want, enable them all to be visible in the tray, so you can have that really cluttered, Windows XP look. I tend to have most of them set to notification only.
Taskbar tips and tricks
Pinning: Pinning a program to the taskbar is easy--just drag the icon to the taskbar. Note that you can’t pin a folder to the taskbar--but then, you never could. In the olden days, you could pin a folder to the Quick Launch bar, which wasn’t the same thing as the taskbar. If you really, really want to pin folders to the taskbar, you can find hacks out in the wild. One way is documented on Sevenforums. But I’ve found Jump Lists to be much more useful.
The magic of middle-click: The middle button on your mouse has two key functions when using the taskbar. Middle-clicking on a taskbar icon will launch a new instance of an application. This is very handy in apps like Excel, which will default to one instance with multiple pages when you open a second or subsequent Excel document. Of course, some apps, like Skype, won’t let you open a second instance, but I often use this for Excel, or to simply open a new instance of another app.
Middle-clicking has another function, too. If you hover over an icon, and multiple document pages are shown, middle-clicking on one of them will close that document. I often use this to close excess open file folders.
Context-clicking magic: Remember the right mouse button! Right-clicking on the taskbar opens up a host of interesting options. You can activate a number of different toolbars, including some that are added by applications. The Zune toolbar, for example, puts a miniature control app on the taskbar when you’re running the Zune app. You can also start the Task Manager, making it easier to access than the old control-alt-delete three-fingered salute. You can close all the windows, which is the same as clicking the tiny box at the extreme right of the taskbar, but slightly easier for me to access. And you can alter window behavior (cascading, side-by-side, and so on). Finally, you can unlock the taskbar, which allows you to make it bigger, or move it somewhere else, if you prefer.
The Windows 7 Start menu and taskbar are powerful user interface tools that allow you to efficiently access applications and offer a host of nifty features and shortcuts. Spend a little time customizing and learning the ins and outs of both, and you'll become a more efficient and productive Windows user.
-
Niktricks.blogspot.com


0 comments:
Post a Comment